To learn MySQL, first we need to learn how to connect to MySQL
server. First you need to open command prompt on your system. To open
command prompt on windows, click on the start menu on bottom left
corner of your desktop, then click on “Run..”., type cmd
and click ok. Now you have command prompt open. Now you need to
navigate to MySQL folder under wamp, to do this , if you have wamp
server installed on C: drive ,
Type
C:\wamp\bin\mysql\mysql5.1.33 and hit the enter key.
You are now in the bin directory under mysql5.1.33 folder.
To connect to MySQL server through command prompt we use “mysql” command. Login to
MySQL
server we need to pass two values with, one is MySQL user and password
for that user. The command looks
like:
mysql –u username –p
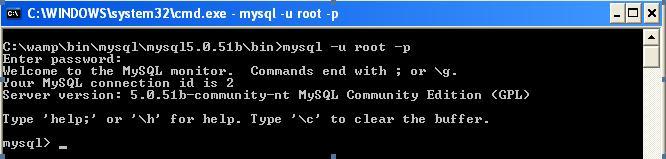
When we have installed WAMP sever by default one user (root) MySQL has been created for MySQL server, with password blank.
To login to MySQL server do to the installation folder of MySQL and write “mysql –u root –p” and it
will ask for, then press enter as because no password has been set for MySQL.
Ref: http://dev.mysql.com/doc/refman/5.1/en/connecting-disconnecting.html
Using SHOW DATABASE statement:
Lets start out MySQL learning journey with simple statement “SHOW DATABASES”. This statement will display all available databases in MySQL.
If we execute “SHOW DATABASE;” then it will generate a output like the following:
l
We have added one semicolon(;) at the end of our SQL statement, to tell
MySQL statement ends there.
If we don’t add the semicolon then MySQL wait for the end of the
statement, as shown in the following output.

Ref: http://dev.mysql.com/doc/refman/5.1/en/getting-information.html
Using CREATE DATABASE statement:
To create database “CREATE DATABASE” statement, followed by the name of the database. Now we are going to create a database named as “siliconindia”.

SQL will be “CREATE DATABASE siliconindia;”.
Using USE statement:
We
have learnt how to create a database, but how to use the database. By
term ‘use’ we mean to say how to fetch data from the database, or adding
a new table etc.
To use the database ‘siliconindia’ we have to run the “USE siliconindia;” statement.

Using DROP DATABASE statement:
Say the siliconindia database we have created is no more required, then
how to delete the database?
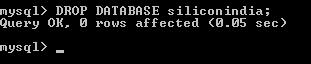
To delete the database we will use the “DROP” statement. Here as because we are deleting database we
will add one more command “DATABASE” with the statement followed by the name of the database
we are going to delete.
SQL statement will be “DROP DATABASE siliconindia;”
We will learn more about “DROP” statement later in this course.
Using EXIT or QUIT statement:
To log out from MySQL server we can use “EXIT” or “QUIT” statement. Type QUIT and press “Enter” key.
l
There is no need semicolon(;) with this statement.
Throughout
the rest of this MySQl Course, you will be using the database
“siliconindia” which you will create using the below statement
Create database siliconindia;
Once you
download the assignment for the first chapter, you will get two files
named siliconindia_new.sql and si_employee_new.sql, which holds the
tables and sample data for these tables which will be under siliconindia
database.
Following are the steps you have to follow to import these tables into siliconindia database.
Open
PHPMyadmin in your system by using the following link:
http://localhost/phpmyadmin/index.php on your browser. (phpMyAdmin is a
free software tool written in PHP intended to handle the administration
of MySQL over the World Wide Web.)
From the left menu of
phpmyadmin, select the “siliconindia” database. Once the siliconindia
database has been selected, upload the files by using “import” option
which is on the top menu of phpmyadmin. Upload the files in this order:
1) siliconindia_new.sql
2) si_employee_new.sql
Once you have uploaded these two files you will have five tables in “siliconindia” database with some sample data inserted.
Ref: http://dev.mysql.com/doc/refman/5.1/en/database-use.html
